Derailleur Cleaning
Derailleur (mech) Cleaning and Set-Up
Whilst the handlebar shifter is the ‘brains’ of your gears, the derailleur is the part that gets to do the hard work and so its condition is important for good gear changes. It’s incredible just how easily the performance of a component can be affected by the build-up of dirt, although, because it tends to happen over a period of time, it can be easily overlooked. I’ve found that front derailleurs tend suffer the most from neglect, especially on entry level bikes where there is more metal in the construction, and it’s often the first thing that I’ll look at when I get a bike to service. This doesn’t in any way except the more expensive variety, but their use of non-corrosive materials means that they do tend to fair a little better. If a derailleur mechanism becomes heavily clogged or badly corroded, the gear shifter itself will also begin to suffer from accelerate wear as its components (lever mechanism and selectors) have to work harder to move the stiff derailleur. It’s good to understand how components are related to each other as it helps us to identify problems and work to prevent similar troubles in the future, so here’s a simple breakdown of the derailleur system and how it works…
Almost all gear selections on modern mountain bikes will be indexed. Indexed means that a toothed mechanism in the shifter determines the precise distance that the gear cable is pulled or released in order to move the derailleur sufficiently enough to de-rail the chain from one gear to the next. The rear derailleur uses a jockey wheel, which also keeps the chain aligned to the gear during riding, whereas the front derailleur pushes the chain physically onto or off of the appropriate chainring. In both cases, the ramping of the teeth on the sprockets, the pins on the chainring and the design and shape of the chain plates all contribute to shifting performance, as do the specific design of the front derailleur shifting plates and the cage and body design of the rear. All of this can become relatively complicated, but they all share the same fundamental idea for their operation (we’ll come to that shortly….).
The Rear Derailleur
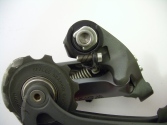
If your bike is new, or if you’ve had a new mech fitted, give it a good wipe down with a little ISA on a soft cloth, paying close attention to the areas where moving parts contact each other (like the seal-edge where the body meets the cage). I’ve found that removing the slightly oily layer that new stuff seems to have reduced notably the build up of dirt. I also tend to remove as much of the thick grease from the spring hooks as possible. There are much more subtle and less dirt-attractive ways to lube and prevent rust on the main spring, like using a dry lube such as Finish Line Dry.
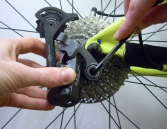
 A more thorough job of cleaning the derailleur can be done with it removed from bike, but both jockey wheels can be effectively cleaned simply by holding a cloth (towelling works best) against the teeth while back pedalling the cranks. You’ll obviously need to make sure that the bike is well propped up or supported and also that the rest of the cloth and your finger are not going to get caught in the chain/wheels. Once you’ve found a comfortable and effective way to fold and hold the cloth in place, you can then modify it to clean the rear of the jockey. If a derailleur is kept reasonably clean and well maintained from new, it’s less likely that you’ll need to remove it for cleaning. The rear of the derailleur and the body spring can be got at easily with a toothbrush when the bike is upside down, but I’d rather remove it from the bike if it needs cleaning.
There are a few minor differences between the Shimano and SRAM derailleur that I’ll point out as we go, but for the most part a rear mech is a rear mech, so the basic principle remains more or less constant. Set-up instructions are down the page, but for now let’s get the derailleur disconnected from the shifter and removed from the frame…
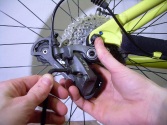
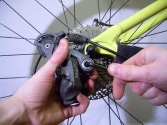
Starting with the chain already removed and in the order of the pictures below, make sure that the shifter has released all cable tension (the derailleur will be typically be lined up with the smallest sprocket. Rapid-rise mechs will be lined up with the largest). Now use a 5mm Allen key (entry level mechs such as the Altus or Alivio will use a 9mm spanner) to loosen the cable clamp bolt and release the cable (first picture below). It’s most likely that the cable will have a crimped end cap which will need to be snipped off or, if you’re lucky, will pull off with a little force. Don’t worry about this as we’ll fit an easier and more practical solution when we refit the cable. With the end cap out of the way, the inner cable can now be fed back through the derailleur and be removed, along with the outer cable, from the barrel adjuster (Shimano) or cable-stop hole (SRAM or Shimano Shadow)(second picture). Use a 5mm Allen key to loosen the mounting bolt from the hanger or dropout (third picture) and remove the mech from the bike, taking care to ensure that all of the bolt threads have unthreaded before pulling the mech away so as not to damage the bolt or hanger threads. The right-hand picture shows the kind of replaceable hanger that is commonplace on aluminium MTB frames. The hanger is designed to bend in the event of an accident so that the frame itself is saved, as an aluminium frame can not usually be bent back into shape in the way a steel frame can.
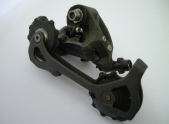
You can see from the first picture below just how much grime and dust can collect on the jockey wheels. The body also picks up a fair amount of dirt, although it’s not really an issue for anything other than aesthetics. The build up of dust and grease in the pivots, however, is the kind of abrasive mix that can contribute to accelerated wear. One thing to bear in mind is that the removal of hundreds of miles worth of compacted grease and grit may end up revealing a heavily worn derailleur. The idea of regular cleaning and maintenance is to prevent such a thing from happening in the first place. The jockey wheels can be removed from derailleur cage by removing the two bolts that also serve to hold the two cage pieces together. On some more recent models or on older high-end mechs, both bolts have their tool interface pointing out-over to make it easier to remove them (middle two pictures). You may find that the bolt holding in the top jockey wheel requires a ball-end or short ended Allen key to get into it (right-hand picture). You may even find that you have to open the derailleur cage right out in order to get your Allen key in.
One of the most obvious variations in derailleur components is the design of the jockey wheels, or, to be more specific, the type of bushings or bearings that they use. At one end of the scale we have plastic bushings or metal bushings (left-hand picture below), then ceramic bushings (middle picture), followed by sealed bearings (right-hand picture). By far the most common in derailleurs before the XT or X9 type of derailleur will be the simple plastic or metal bushings…
The wheels themselves can just be wiped down with a cloth. If the grime is particularly thick, use a screwdriver to scrape it away and then give the wheel a final wipe. Don’t forget to clean between the teeth. Any heavy, compacted dirt can be softened with a little WD40 applied with a cotton bud and then rinsed with a little IsA. Dust covers and bushings should also be cleaned and dried, while the sealed bearings can just be wiped over. The XT derailleur uses two rubber seals which act with the dust covers to keep dust and water out of its ceramic bushing. These can be carefully prised out with a pin or jeweller’s screwdriver before being carefully cleaned and dried. A small amount of waterproof grease can be wiped around the bushings before you refit them to help keep them running smoothly and prevent corrosion on the metal versions. Even a dry lube like Finish Line Dry is OK to lube the bushings, but whatever you use, make sure that any excess on the outside of the seals/covers or jockey wheel is wiped away before you refit the wheels to the derailleur as it will only attract more muck.
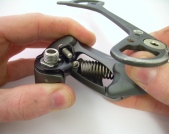
With the jockey wheels and the rear of the cage off the derailleur, the body can be cleaned. I use Finish Line Bike Cleaner or Muc-Off and give the mech a good spray before leaving it for a couple of minutes. A toothbrush is perfect for getting into the spring and inside the body of the derailleur, as well as cleaning out the crud from the joints at the pivots. Don’t be shy opening the derailleur body out so that you can get your brush into all the nooks and crannies, but be aware that the springs are very strong and will snap the derailleur closed again if you let go of it when the springs are under tension. The grime and cleaning fluid can be rinsed away under a hot top. Bear in mind that the seals at the cage spring and the main body are not designed to be submerged in water, so rinse quickly. Thankfully, there’s nothing to harm in the area where the exposed body spring is, so you can scrub, rinse and repeat this area pretty thoroughly. Use a soft cloth to dry the derailleur as best you can, blowing into the tight spots to expel any trapped water.
With the derailleur now fully cleaned you can treat the 8 pivots with a little dry lube. The advantage of a dry lube on moving parts like derailleur pivots (front and rear) is that it will act as much as a barrier as it does a lubricator. When it sets, dry lube will form a ‘cap’, which will hold any accumulated dirt way from the component, rather than mixing as it would with an oily lube and penetrating the joint you’re trying to protect from wear.
It’s a good idea to drop a little dry lube at each end of the main spring, where it hooks onto its mounts. If you get out in the wet much, or have a few stream crossings on your usual trails, then you could drip some down the entire length of the spring, too. Leave the derailleur for a while too allow the lube to soak in and dry some, then use a clean cloth to wipe any excess lube off from the derailleur body. The reason that I use a dry lube is that once it has set it tends not to spread out, so it keeps the points of contact lubed but doesn’t attract a great deal of dirt. It also form something more like an actual barrier between the component and the environment, whereas a fluid, wet lube will hold any collected dirt against the component.
OK, so we’ve stripped down, cleaned, dried and lubed our derailleur and can refit the jockey wheels and cage plate. No need for any separate explanation, it’s a simple reversal of how the derailleur was dismantled.
The initial consideration when refitting a derailleur is that the body (B) adjust screw is clear of the hanger (first picture below); holding the derailleur at an exaggerated angle (middle picture) when lining up the derailleur bolt and the hanger should ensure this. If you’ve cleaned all of the threads properly, there should be little, if any resistance when you try threading the derailleur bolt into the hanger. It’s easy with such an odd shaped component to hold it at the kind of jaunty angle that will make it harder to thread it in straight. One way to check that you’ve lined everything up is to position the bolt against the hanger, with just a little bit of pressure, and slowly turn the Allen key anti-clockwise, as though you were loosening the bolt, until you feel the two thread-ends pass over each other; it’ll feel like a small ‘bump’ as you turn the key. As soon as you feel the bump, carefully start turning the bolt in the correct direction to tighten it. Remember that there should be very little resistance, so if it starts becoming stiff, just back the bolts out and start again. Using and getting comfortable with the ‘back-until-bump’ technique is about the best way to ensure you’re lining threads up correctly, especially when your view is obscured by the component you’re fitting. Once you’re happy that the bolt is threading in properly, tighten it down until the derailleur is held firmly in place. The third picture shows the fitted derailleur from the rear, the wheel removed for clarity. Don’t worry about the correct position of the B screw for now, we’ll come to that in a moment…
With the derailleur in place, refit the chain, taking it around the middle front ring and the smallest cassette sprocket. You may or may not have removed the two limit adjust screws when you cleaned the derailleur, but for the sake of a set-up instruction, we’re going to back them off so that they are not affecting the movement of the derailleur.
Click here for derailleur set-up instructions.
Back to main guide…







You mentioned the following: “I also tend to remove as much of the thick grease from the spring hooks as possible. There are much more subtle and less dirt-attractive ways to lube and prevent rust on the main spring, like using a dry lube such as Finish Line Dry.”
I feel that the grease is a better option for most people, especially if you don’t plan on cleaning and lubing your derailleur every few rides. I agree that the grease attracts dirt, but it will continue to protect the spring for a long time, while the Finish Line Dry will wash away quickly exposing the spring to wear, thus forcing the owner into an unnecessary habit of having to meticulously clean/lube the mech often.
MTO
December 4, 2008 at 9:10 am
The reasoning behind using a dry lube is that it will keep dirt at the surface, rather than wherever there’s lube. I agree entirely that if one rides often in wet conditions and isn’t prepared to clean the mech afterwards, then a heavier grease could indeed be advantageous. Bear in mind that each end of the spring can be lubed easily when the bike is flipped up-side down, so there’s not even any need to actually remove the derailleur to do this.
SteveUK MTB
December 4, 2008 at 12:19 pm
How would one remove/clean the Front derailleur? I find even with a toothbrush I can never really get at it and it ends up being packed with dirt most of the time…
MTO
December 5, 2008 at 11:09 pm
Also wondering why you would use muc-off for example to clean the derailleur instead of Mineral Spirits?
I’d rather avoid having to purchase 3-4 different solutions to maintain the bike, so I’m wondering if water+detergent would be just as effective as mucoff.
MTO
December 5, 2008 at 11:32 pm
Try cleaning your derailleur with mineral spirits and post back with the results. Bear in mind that both of the internal springs of the derailleur body are coated in grease to protect them from corrosion – the ingress of mineral spirits would disolve this grease quite quickly.
Different task require different types of cleaning solutions, all depending on what type of grime needs to be shifted. We’d be making life hard for ourselves if we tried using plain water to clean the grease from a hub interior during an overhaul. Likewise, we’d soon discover the mistake in using WD40 to clean our disc brake rotors. Some solutions, like mineral spirits, are oil-based and often require another solution to remove them, and yet in the initial task are the most suitable tool. Are you with me?
SteveUK MTB
December 6, 2008 at 6:52 pm
Nice job with this page… I am just goofing around from one bike maintenance page to the next. WHY? Well, I am currently stripping a road bike of all of it’s parts in order to clean and weigh all the parts before reinstalling them on a new frame (I broke the old one). After being involved with my own bicycle maintenance for the better part of 30 years, I can say that a newbie coming upon your page will get the job done properly the first time. Keep up the good work! – CJ, Port Richey, FL, USA
CJ Smith
January 28, 2011 at 4:23 am
Hi Steve,
Great site !
What is IsA by the way ?
thomas
February 13, 2011 at 1:21 pm
Thanks Thomas. IsA is my abbreviation of Isopropyl Alcohol
SteveUK MTB
February 13, 2011 at 2:34 pm
Hey thanks for taking the time to write up what a lot of sites seem to take for assumed knowledge. It’s really helpful to have a thorough and meticulous guide as reference for someone just getting into mountain biking, much appreciated!
Ryan
June 13, 2011 at 9:16 am
Thanks Ryan, that means a lot.
SteveUK MTB
June 13, 2011 at 10:33 am
Hi Steve, thanks for the page. Riding for years but always been hopeless at maintenence! having just been for a nice muddy/wet ride here in Oz will definatly be a bit more vigilant with cleaning the deraillieur from now on. Gez
Gez
July 4, 2011 at 7:01 am
For the front derailleur – OK to use a degreaser spray to clean front/rear derailleur or would that remove an important lubricant? PS – I clean my bike frame, chain and derailleur’s after each ride. Call me compulsive, but the bike picks up a lot of cr_p during my trail rides.
Fred
February 22, 2013 at 5:35 pm