DMR V8 Pedal Overhaul (Cup and Cone)
(click on a picture or link for a larger image to open in new window)
The V8 pedals use cup and cone bearings (1/8″ ball bearings). Although the V8’s have a ‘Grease Port’ for periodically injecting fresh grease into the bearings, this won’t clean out the crud and grit that’ll start to eat at the bearings and races. It’s a very, very simple procedure, so give your pedals a spin every now and then to check for grinding or excessive drag. An occasional overhaul will keep them spinning smoothly. The principle here is the same with most bicycle pedals that use loose bearings.
Start by removing the pedals from the crank arms, using a 15mm spanner. The right (drive) side pedal will loosen anti-clockwise and the left (non-drive) side pedal will loosen clockwise.
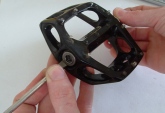
The outside edge of each pedal has a plastic cap which can be prised out with a small point or screwdriver, taking care not to damage it (1). Holding the crank-side of the with the 15mm spanner, use a 12mm socket to remove the retaining nut from the outside bearing assembly (2). Use a flat-head screwdriver to carefully hold one of the edges of the bearing cone. Take care to only press against the cone and not catch the screwdriver against the bearings or the cup of the pedal (3). Spin the pedal axle and the cone will screw off, pushing the washer with it (4).
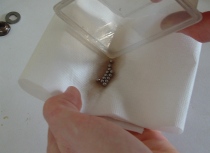
If bearings are being reused, it’s best to keep them in the group that they’ve been used in. There’s no guarantee that the bearings in the inner race have worn at the same rate as those in the outer, so we’ll remove and clean the outer set first, while leaving the inner set in place. Keep a hold of the axle and use a plastic pen top to extract the bearings, dropping them into a container for cleaning (5). Use WD40 or a citrus degreaser to rinse; gently swilling them and mixing around with the plastic pen top (don’t use metal tools to mix!), then transfer to a tissue to wipe them over and catch the loosened grease (6); rinse and repeat until all old grease has broken down. It’s worthwhile to give a final rinse in Isopropyl Alcohol before drying the bearings off thoroughly and putting safely to one side. Remove the axle from the pedal and tip/prise out the remaining bearings for the same treatment (7). A cotton bud dipped in WD40/degreaser is ideal for wiping the inside of the bearing cups.
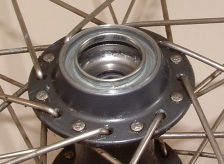
The cups of the pedal should be totally smooth (8). Older pedals may have a distinct line worn around the cup; this is OK as long as it is smooth and consistent. The hub bearing in (9) is severely pitted. This kind of deterioration in a cup will inevitably spell the end for a component.
Picture (10) shows all of the V8 pedal components, minus the bearings. Note the rubber seal that sits in the crank-end aperture. All of these components should be degreased before refitting, although ‘wetting’ the rubber seal with a little grease will help prevent it from perishing.
The grease for the bearings should be medium thickness. I don’t know if DMR market the grease that they supply with the V8’s, put Pedro’s Syn or Rock n Roll Red Devil are an excellent replacement. I use one or the other for most bearing applications. A grease gun is useful here, or the small syringe that DMR supply with the pedals as it’ll allow you to get just the right amount of grease into the race. Whatever, run a line of grease around the pedal cup (11), then use the plastic pen top/tool to place the bearings back into the cup (12). Another run of grease over the top of the bearings will hold them in place (13).
Repeat this procedure on the other cup and re-insert the pedal axle (14), taking care not to knock any of the bearings out of place, although they should be pretty well held in by the grease. Holding the crank-end of the axle in place; screw the cone race onto the other end of the axle. The cone should be screwed down lightly until it touches the bearings. I use a small screwdriver to gently thread the cone on (15), taking care not to go past the cone and scratch the bearings or cup. Once the cone is in place, drop the washer onto the axle.
Setting the bearings can be a series of trial and error adjustments. The idea is for the bearings to be sandwiched between the two races (cup and cone) with the smallest amount of compression possible. Too little and the axle will shift on its axis and cause uneven wear to the bearings/races; too much and the excessive friction will lead to rapid wear/destruction of the bearings/races.
Bear in mind that the tightening of the locking nut will slightly compress the assembly. Thread the cone race down until it touches the bearings, then back it off by a degree or so and fully tighten the locking nut. Hold the pedal in one hand and the axle in the other (16) and feel for any play in the assembly. Does the axle wobble in the pedal? Is there obvious friction when you spin the pedal on its axle? Remember that you’ve just fitted fresh grease, so the pedal’s spin is going to be a little heavy.
To make any adjustments, loosen the locking nut slightly and carefully insert the tip of a flathead screwdriver between one edge of the cone race and the pedal body (3). Use fingers or a 15mm spanner to tighten/loosen the axle appropriately. Repeat these adjustments until the axle feels well placed; spins easy (no grinding) and doesn’t wobble.
Run a thin line of grease around the hole and refit the plastic dust cap to the outside edge of the pedal body.
Grease the axle threads before refitting. Remember that the non-drive (left) side pedal will tighten anti-clockwise. Take care when threading the pedals in; a cross-thread here is much more likely to ruin the crank arm than it is the pedal.


Just more pictures of similar pedals (the description is in Polish but pictures are international)
http://picasaweb.google.com/xc0rider/Wellgo
Besides that older designs are not so friendly – you have to immobilize the cone by yourself – there is no washer and the axle is round to the very end.
Marcin
August 22, 2008 at 9:10 am
Cheers!!
Danny
April 19, 2009 at 11:50 pm
Hello Steve
I’m looking to buy a pair of DMR V8s. I’ve read a few people who’ve said that DMR don’t supply enough grease to pack the pedals with. Is there any truth in this do you know?
If I did run out, would it be ok to finish packing a pedal with another grease (mixing two greases together) ? I’ve got some Park Tool Polylube 1000.
Thanks
Dave
June 1, 2009 at 8:56 pm
Hello Dave,
Any mass-produced component is going to have examples of inconsistencies somewhere in their assembly, so I wouldn’t be surprised if the occasional pedal was short on grease. It’s probably safe to safe that it’ll be a minority, though. It should be fairly obvious when you spin the pedal whether or not it’s short on grease as it’ll probably sound quite dry. I think the newer V8s all have a grease port and are supplied with a syringe of thick grease, so it’s an easy task to top-up any short-fall.
The Park Polylube is specifically intended for bearings, so is surely a suitable replacement. I wouldn’t like to advise on whether or not it would be OK to mix it with the DMR factory lube, but you could always try mixing it with the grease in the supplied syringe and see how it reacts and how well the two substances blend.
I would be happy to recommend the V8s to anyone. The pair you see in the guide – which was originally published on MTBR in April 2006 – are still in use today, having had two overhauls since I bought them in late 2005. Although I’ve tried other pedals in that time and now use V12s on both of my bikes, they’ve still had plenty of use on one bike or another, in all seasons, and are currently being used by my partner on her bike. They’re due a service, but give no indication of approaching demise. Given the level of grip and the obvious serviceabilty, they are, in my opinion, probably the best value platform pedal on the market.
SteveUK MTB
June 1, 2009 at 10:17 pm
Thanks for the quick, thorough reply. And your guides and helpful and well written. All the best Steve.
Dave
June 2, 2009 at 11:25 am
Thanks – I couldn’t work out why my pedals were so tight but holding a screwdriver on the washer and loosening a couple of turns did the trick.
They are now full of grease and ready to go.
Fenix
August 9, 2009 at 11:53 pm
Hi, thanks for the tutorial, I didn’t know you could take them apart!
I do over 3500 miles a year commuting by bike so my old DMR’s have well over 12000 miles on them and are only just showing signs of wear without being serviced!
Al
Al
September 17, 2009 at 1:31 pm
I’m loving these pedals, and I’ve got a pair on 2 of my bikes. I’m just curious if you’ve ever had issues with the left pedal tightening itself. To clarify, I’ll set the bearings perfectly, with plenty of grease, but after a day of riding the left pedal will hardly spin. Somehow the cone tightens down on the bearings while riding. Have you ever had this problem? It only happens on one of the pairs of pedals, the other set works perfectly.
Bobby
March 10, 2010 at 7:02 pm
The only way that the cone would change its position during use is if the lock-nut hasn’t been tightened properly.
SteveUK MTB
March 10, 2010 at 11:55 pm
This also happens if you forget to fit the washer.
Stephen Turnbull
March 24, 2011 at 5:59 pm
I would like to replace the cones, cups and bearings in my pedals on my Trek 3000…Where could one find the supplies to do so ? The axel end (cone) on both pedals are not gauled so they will survive with grease as this is a second hand bike to me and was neglected…Thanks
Steve West
August 1, 2011 at 3:46 am
What make/model are the pedals? Are they V8s? Cones will often be available as spare parts (try a web search); but cups are usually pressed into the pedal body tend not to be replaceable. If they are damaged, it usually means that it’s time for new pedals.
SteveUK MTB
August 2, 2011 at 12:00 pm
I have DMR V8 pedals on one bike that I’m now getting some play on so want to service but the nut on the right-hand pedal (12mm socket spanner) is very tight – I can’t move it either way. My query is whether the threads on both sides are normal (right-hand) thread, or is the right-hand pedal a left-hand thread as on the Wellgo MG1s on my other bike. Thanks if you can help.
Brian
February 28, 2013 at 4:15 pm