Hope Mono Caliper Overhaul (Mini/Trials/M4/V2/M6)
(click on pictures and links to open a larger image in a new window)
** Wear Safety Glasses **
Before you go pulling calipers apart, try cleaning and lubing the pistons. Using a thick washer, like in picture (4), extend the pistons fully and clean the piston surfaces with a cotton bud soaked in DOT fluid, a silicone spray lube. or plumber’s silicone (something like Hunters) The tolerance between the pistons and their bores is quite fine so it’s not unusual to get some dirt build-up, especially if you ride in particularly dusty conditions. Extend the pistons, clean with cotton bud; drip/spray silicone over pistons; push pistons back into caliper using a plastic tyre lever. Repeat the process two or three times, then fully dry the caliper interior, refit pads and try the brake’s operation again. If a seal has failed, it will usually be evident by the refusal by the piston to return after the brake lever is released.
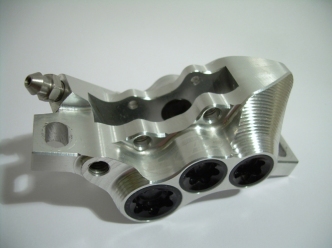
The following guide is for overhauling Hope’s Mono calipers (the corresponding guide for the Mini/Mono lever can be found by following this link.). Mono simply refers to the caliper being cut from a single billet of aluminium, rather than the two-piece design used by the original Minis or closed caliper brakes, so all Mono (Mini, Trials, M4, V2 and M6) are covered here. If you can do a seal change on a Mono Mini, then you can do a seal change on an M6. Special tools are required for this procedure as the piston bore cap has a splined interface for removal/fitting. Unless you’re fortunate enough to be able to machine or manufacture a suitable tool yourself, I would strongly advise against trying to remove a bore cap with anything other than the appropriate Hope tool. There are five different tools, each with specific capability…
• Mono Mini
• Mono M4 large cap
• Mono M4 small cap/M6 large cap
• Mono M6 small cap
• Mono Trial/V2 cap
These tools can be ordered through your local shop or online through retailers such as Chain Reaction Cycles (free P&P in the UK!) or Jenson USA.
The other tools required for the job would be an 8mm spanner for the banjo bolt at the caliper and for the bleed nipple; a 2.5mm Allen key (Mini) or T10 spline tool (Moto) to remove the master cylinder (MC) cap bolts; a very small point, like the jeweller’s screwdriver shown below, to remove and fit the seals. This can be quite a messy procedure, so keep a roll of tissue paper handy, as well as the mandatory bottle of Isopropyl Alcohol (IsA). Did I mention safety glasses?
Seal kits should contain one flat-edged seal per piston; an ‘o’ ring for each bore cap; and a cap for the bleed nipple, as seen in this seal kit for the M6 caliper being overhauled here.
The caliper should be removed from the bike, although the lever can remain on the bars and, for the moment, attached to the caliper. The pad retaining clip can be removed by gently pushing the looped section up and over the end of the pin with a small point (1), although a fingernail is good enough if you have the length. Make sure to keep another finger ready to stop the clip flying off when it pops over the end of the pin. With the exception of the V2 (and possibly the Trials), where the pad pin unscrews (3mm Allen), the pad retaining pin can now simply be pushed out of the caliper (2). Remove the pads/spring (3) and, if you’re going to reuse them, put them somewhere where they won’t get splashed with DOT fluid.


Because the Mono calipers only allow direct access to the outboard piston(s), we can make our job a lot easier by extending the inboard piston(s) out of the caliper before we go any further. I have a thick washer (4) that fits inside the rotor aperture on the Mono calipers and which I can use to extend the pistons without them coming free of the caliper (5). If you have a spare rotor lying around, this will do perfectly, but take care not to scratch the pistons or caliper body. Outboard pistons can be pushed back into the caliper using a plastic tyre lever (6) before depressing the lever again to extend the inboard piston(s) (7). This procedure ranges from ‘simple’ on the Mini to ‘mildly frustrating’ on the M6, so perseverance and patience are necessary on the multi-piston models. Remember that as soon as one piston is free of the caliper hydraulic pressure will be gone, so keep them moving evenly until you feel that each can be moved the last step past the seal by pulling with your fingers. This step can be made easier with a helping hand to pull the lever while you control the pistons.
![]()
![]()


(The small pistons of the M6 can be awkward to get at if your fingers are over a certain size, so you could try some long-nose pliers with a small piece of inner tube to protect the piston. I can’t stress enough the amount of care required if you resort to this method. A scratched piston will almost certainly require replacing as it will damage its seal and possibly even the caliper itself. Go slow, manipulate rather than pull.)
With the inboard piston(s) removed (pic), the hose can be removed from the caliper, so get a piece of tissue handy and remove the banjo bolt with an 8mm spanner (8). If you can keep the caliper above the height of the lever while you do this, spillage will be kept to a minimum. Keep the caliper tilted back slightly to stop fluid leaking. When the bolt is out, wrap the tissue around the banjo (I leave the bolt and copper washers attached) and secure it with some tape or a cable tie (turning it inside out so that it can’t lock makes it reusable). I then pop the wrapped end behind the hose at lever (9), securing it with another cable tie if necessary.


The outboard pistons are considerably easier to remove. The splined bore caps, which also comprise of a rubber ‘o’ ring seal, can be in quite tightly, so, if you feel as though you’re having a struggle, just bolt the caliper back onto the bike (careful not to get DOT on paint or rotors) which will allow you to concentrate on holding the tool rather than gripping the caliper. If you have a tool with a rounded shaft, like a screwdriver, then use this to act as the handle for the bore cap tool (10). Otherwise, a 5mm Allen key does the job. Make sure that you have the caliper gripped firmly in one hand, whilst keeping a firm, even grip on the bore cap tool and its handle, pushing the cap and tool together while turning. The caps and cap tools aren’t as tight a fit as I think they could be, so guard against the tool slipping out of the cap. When the initial torque has been released, the handle can be dispensed with and the cap removed by turning the tool by hand (11). As appropriate, drain each piston bore as you open it (12).


With the cap(s) out, the piston(s) can be removed. To prevent any damage to the piston(s) or caliper, cut a piece of card the same width as a brake pad and slide it into the caliper to ‘catch’ the piston(s)(13). Put a suitably sized tool inside of a cloth and use it to gently push the piston(s) out into the pad/rotor aperture of the caliper (14).


To remove the seals, carefully insert a point or small screwdriver behind the seal and prise it forward (15). Each seal should crimp forward and allow you to move your tool around the seal aperture until the seal lifts out (16). Sod’s Law says that inboard seals will eject themselves into the bore rather than out to freedom, forcing you to root around to get them out…


With all the seals out of the caliper, all that is left is to clean the body down thoroughly. Try to resist rinsing with water or IsA as it’ll only end up trapped in the fluid routes of the caliper and make bleeding a nightmare or future performance suffer. A scrunched tissue can be threaded down the piston bore (17) before a cotton bud with a little IsA on it is used to get into the nooks and crannies of the seal apertures (18). Remember to dry all surfaces, too. The bore caps should be checked for ‘loose’ threads. I’d say about 70% of all caps that I’ve removed have had shavings of aluminium on them from the caps themselves or the thread of the caliper. Ensure that any ‘swarf’ is removed from all threads.


Fitting the new seals should be pretty straightforward. Again, things get a little more finicky the more pistons you have, but patience is an excellent tool. This part is basically guideline; the seals can bend and move into various unhelpful shapes, so although the process of lubing and fitting is typical, you’re going to have to develop your own method for actually getting the seals seated in the caliper. You should put a drop of DOT fluid or silicone grease into the seal aperture (19) before rotating the caliper to spread the fluid right around the internal surface. This lubricates the seal evenly to prevent it from sticking to the caliper and affecting the movement of the piston. Also, lubricating the aperture rather than the seal makes it much easier to manipulate the seal into place. Each seal can be nipped gently to elongate it enough so that it can be easily placed in the seal aperture (20). A combination of gently finger pressure and a plastic point is best suited to poking the seals into place. It is a low force task, and so a needle or small screwdriver is perfectly alright for ‘pressing’ the seal into place so long as you tread carefully. Once the piston seals are fitted, the pistons themselves can be reintroduced to the caliper. The phenolic pistons most commonly found in the Mono calipers are marked with a letter/number on the outside face; the opposite (internal) face has a bevelled indent (21). Use a cotton bud to get a good coating of DOT or silicone grease to each seal before inserting the piston (22). Take care to ensure that the piston is lined up perfectly with the bore and insert outboard pistons from inside the rotor/pad aperture, not down through the bore. The bevelled edge of the rear face of the pistons will pass over the square edge of the seals much more easily. You may find it helpful to drip a little DOT fluid around the piston before pushing it into the caliper. This can be done from two sides on the outboard piston(s) and will usually make for a smoother insertion. It can take quite a bit of force to fully depress a piston past a newly fitted seal, but always double check that the piston is straight with the bore before increasing your force.


Once the pistons are all replaced, the bore caps (with new seals) can now be refitted. Remember to wipe a little DOT around each seal before you thread the bore cap in. Take time to ensure that the threads aren’t crossed; you should be able to thread the cap in easily using the bore cap tool by hand, no handle. If it feels too tough, back off and start again. The caps can be torqued fully once they are fully seated by introducing a handle to the tool. Your caliper is now ready to be reconnected to the hose and the system bled and put back into action. It’s usually worth pulling the pads after your first ride as there will probably be a small residue of DOT fluid left over from the seal insertion process. Give the back of the pads a wipe and also the inside of the caliper around the pistons.
Follow this link for instructions on bleeding your brake.
This guide and the photographs contain within it are my property and as such are covered by copyright. Please feel free to provide links to this guide, but do not copy or reproduce any part of it without my permission.

“Remember to wipe a little DOT around each seal before you thread the bore cap”
im confused since the seal is already covered by the piston?
C_George
October 31, 2008 at 4:40 am
The purpose of lubricating any seal prior to assembly is to help ensure a good seal by softening the rubber a little.
SteveUK MTB
October 31, 2008 at 11:35 am
Thanks! These instructions saved me! Rear brake no longer leaks and stops better than new.
bruce
April 5, 2009 at 9:26 pm
great instructions, overhauled my mini mono in about an hour, need to test it but seems spot on (and if it isn’t it’ll be my fault not these instructions :o)
thanks for posting it up.
Neil
April 27, 2009 at 8:43 pm
i plan to change the bore caps, does that mean that i will have to buy new bore cap seal or are the existing ones good enough to re-use?
cheers chris.
chris
August 29, 2009 at 10:01 am
New caps should be pre-fitted with new seals. If you’re replacing with caps that have had the seals removed for some reason, you can just use your old ones. New seals can’t be bought by themselves; they come as part of the caliper overhaul set.
SteveUK MTB
August 29, 2009 at 8:58 pm
Steve, truly wonderful web site!
my M4 rear brake has no “modulation”. ie. it has no feeling other than being solidly on or not on. I did an overhaul on the levers but that didn’t improve that feeling.Is it time to do an overhaul of the caliper?
Thanks,
David
David Jowsey
November 26, 2009 at 6:59 pm
Thanks David.
An On/Off lever feel could be several things, and not just seal related. Has the lever travel changed or just the feel of the brake? Have you checked that the rotor is running through the center of the caliper and that both pads are moving freely when you pull the lever? What are the pistons doing when you pull the lever?
If the wheel has been refitted with a different QR tension, this will have alter the position of the rotor. Check also that he the wheel hasn’t moved/twisted in the dropouts.
Is there any sign of contamination on the rotor? Black streaks or dark patches? Whip the pads out and inspect them: does the pad surface appear wet/gummy?
If you can wittle it down to poor piston operation, you may be able to deal with the problem with just a good clean. Using a fat washer (as per the caliper overhaul guide) to allow you to extend the pistons right out, clean them up with a cotton bud and either drip some DOT fluid on them or use a proper silicone spray or lubricant before pushing them back into the caliper. Extend/lube/return them two or three times and you may just find that they’re good again.
If you still have piston problems after that, then it looks like a full overhaul is what the brake needs. As you can see from the guide, it’s a simple if slightly finicky procedure.
SteveUK MTB
November 26, 2009 at 9:11 pm
Full rebuild did the job!
Thanks a bunch.
David Jowsey
December 21, 2009 at 10:46 pm
hi,done a full rebuilt of caliper ,and now i notice some very small air bubbles coming out from piston when lots of pressure applied.can the caliper body be damage to leak? cheers
Franck
franck
March 9, 2010 at 11:54 pm
It’s most likely nothing to worry about. There may just be air bubbles trapped behind the piston seals from the rebuild, so just clean and dry around the inside of the caliper and around the pistons and start using the brake. After your first ride, check the back of the pads for fluid. You may find a small amount (in a circle) which you can just wipe away. Keep an eye on it for the first few rides, but you should be OK.
SteveUK MTB
March 10, 2010 at 12:19 am
Hi Steve
ive been looking for a site to help me with my moto v2 brakes for ages. it looks like ive found it.
my rear brake makes noise on the disc, when i inspect the caliper the inside piston is rubbing the disc, i have repeatedly retracted the pistons and cleaned with cotton buds and silicon sprays, this fixes the problem for one ride only. i want to do a rebuild using new pistons, can i get phenolic pistons for the v2 or just original, i also would like to know where i can get i complete kit that will do the job, thanks Steve
Mike
March 26, 2010 at 1:07 am
Hello Mike. The V2’s pistons are made of phenolic as standard, so there’s no upgrade; however, there are a few things to try before gettign new pistons.
Because it uses two huge pistons, the V2 is incredibly sensitive to misalignment of the caliper, and it is this, I would surmise, is most likely at the root of your problem. The easiest way to get it spot-on is to get the pistons clean and lubed, push the pistons back so that they are flush with the caliper interior, and then wipe the whole area so that it is totally dry. Align the caliper visually, using feeler guages if possible, then refit the pads. Go through the piston centralisation process (slowly, though; without ever applying full force to the lever), so that each piston moves equally, then loosen the caliper mount bolts just enough to allow the caliper to move. Whilst applying a downward (towards the hub) pressure on the caliper, pull, or have somebody else pull, the brake lever so that the pads fully grip the rotor; then tighten the caliper bolts, before releasing the lever. Double check the pad/rotor centralisation and tidy up any wobbles on the rotor – you should be good to go.
If this process doesn’t sort you out, then perhaps new seals will do it. They are available online – sometimes just listed as ‘Moto seals’ – and the process for replacement is just as described in this guide.
Out of interest, do your calipers have a small line marked on the fin-type portion at the rear? It would be running in-line with the rotor…
SteveUK MTB
March 26, 2010 at 6:58 pm
thx for the prompt reply steve, my calipers do have a marker line on the caliper fin,
i think your right with what you have described, i had a close look at the operation of the pistons on yesterdays ride, it seems both pistons are moving. but the pad that is riding up against the disc pushes the disc over towards the other pad when the lever is applied.
thanks for your help i will get the spanners out and let you know how i get on.
Mike
March 28, 2010 at 2:03 am
Check out the alignment and centralising videos on Hope’s website (link).
SteveUK MTB
March 28, 2010 at 9:44 am
hi steve
just came in from the shed, i was working on cleaning the pistons one was extracing out no probs the other one wouldnt budge so i applied the restraining force technique to force it out, it came out alright so did the brake fluid, so just to confirm with you i am going to replace the seals, and hopefully the piston/pistons should not be damaged,
thx mike
Mike
March 29, 2010 at 7:27 am
So it sounds as though the piston was either stuck at the seal or twisted in the bore. I suppose that at this point it doesn’t matter which, as the fix is the same for each. You may find that the system works fine with the original seals, but since you have it pieces (sorry!!), you’re half way to a full overhaul anyway. If you have the patience, you may be rewarded with a working brake if you just clean an reassemble what you have. It should be entirely obvious if there’s any piston damage; the phenolic plastic which the piston is made of if very hard, but quite brittle. If you can see any chips or scrapes, then I would recommend replacing the piston; nice and smooth, it should be fine.
When you refit the seals (new or old), make sure that you get DOT or silicone lube into the seal recess in the caliper and that you lube the piston upon refitting. DOT is great, but a proper silicon lubricant will make reassembly much easier and also reduce the break-in tiem of the (new) seals. You’ll find that you need to wipe the back of the pads and caliper interior after your first couple of rides, just to get clear the excess fluid, but it’s worth the minor trouble. I’ll stress again the importance of caliper/rotor alignment and piston/pad centralisation – this will make sure that both pistons work from the outset. It’s possible that you problem has been caused by that stuck piston having been inactive since the brake was first installed.
SteveUK MTB
March 29, 2010 at 11:32 am
Hello Steve
Thanks for your efforts with the web site.
Just rebuilt my front mono mini with new pistons (plastic) and seals, but I cant get the pistons to reset after bleeding, when i release the lever they retract all the way back, no amount of pumping the lever makes them move inwards. When they do reach the disc the lever is almost back to the handle bars but it is firm and not squidgy.
Any suggestions ?
nick
May 4, 2010 at 9:11 am
That’s an odd one. Did you also replace the lever piston seals?
You say that the pistons won’t extend; but you also say that they retract all the way back when you release the lever. If they won’t extend, where are they retracting from?
So, as well as the Q about the lever seals, here’s a couple more:
Can both pistons move when you’ve pumped enough? You’re sure that one isn’t twisted/stuck in the caliper?
Did you have any trouble pumping fluid through with the lever when you bled?
SteveUK MTB
May 4, 2010 at 9:47 am
Thanks for replying.
Sorry for not being too clear.
Both pistons move freely when i pull the lever, but when i let go of the lever they both retract back fully into the caliper, so i cant reset them. When i have bled them before, by pumping the lever the pistons creep out until they are a small distance from the disc.
No , I haven’t replaced the lever seals.
yes both pistons move very freely.
No, I had no trouble at all in pumping the fluid through when bleeding.
thanks.
nick
May 4, 2010 at 10:25 am
So even when you manage to pump the pads/pistons all the way out to the disc, they’ll then retract all the way back into the caliper when you release the lever for the last time? Do you still get this problem if you leave the diaphragm and MC cap off when resetting the pistons?
Given that a negative pressure would be required to retract the pistons further than they’ve been extended, I find myself a little baffled. As the Hope is an open system, I can’t see how any kind of pressure – positive or negative – could be present in the system once the lever is released (and in the neutral position).
Did you wedge something in between the pistons when you bled? If you do this now, so that the pistons can’t move at all, how does the lever feel when you pull it?
SteveUK MTB
May 4, 2010 at 10:44 am
Yes that’s correct,the pistons don’t “work” their way out, they retract back too far from the disc when i let go of the lever.
I haven’t tried leaving off the reservoir cap, I’ll give it a go tonight.
Yes the pistons were wedged fully back when i was bleeding them, I’ll try wedging then again and see how they feel, but, when i pull the lever the pads do just touch the disc and the lever is firm then.
Thanks, I’ll let you know how i get on.
nick
May 4, 2010 at 11:19 am
Hi Steve,
I have been reading through your entire site, but I am not 100% sure about my problem.
I have a couple of Hope Mono new mini brakes, and since this week the rear brake pistons are not retracting when lever is released.
I already bled the system several times, cleaned both pistons and caliper, refitted the pistons entirely and refilled the oil.
Nothing helped and the pistons refuse to retract back into the caliper.
I also see that 1 of the pistons comes out much easier than the other one. Manual pushing them back into the caliper is no problem.
Have not replaced the sealings yet as they don’t looked damaged or dragged at all.
Brake functions are still ok, no leaks.
Is a replacement of the seals needed in this case or am I missing something else?
Thx
sammy
October 28, 2010 at 11:37 am
If you’re confident that the brake is bled properly then it would certainly appear as thought the caliper seals are the culprit. Have you tried a good lubing, as described at the start of the caliper overhaul guide?
Have you had the seals out? Sometimes a caliper can be sorted by removing the seals* and cleaning the orifice that they sit in. If this orifice gets crammed with dust the seals can not function properly.
*Pay attention to orientation as they are likely to fail completely if you replace them back-to-front. The square seals will distort over time and use.
SteveUK MTB
October 28, 2010 at 1:28 pm
Thx for the quick response (as always ;-))
I guess the bleeding was done ok, afaik all air is out of the system.
Can there be some air locked up between the piston and caliper?
Seals have not been removed. Lubing was done with DOT oil itself.
sammy
October 28, 2010 at 6:10 pm
It’s easy enough to check a bleed by just putting a washer or a couple or rotors into the caliper’s rotor slot and pumping the pistons out. With the pistons inhibited by something solid like a metal washer/rotor, the bite point should feel very hard and defined through the lever. Any air at all in the system will take the edge off of this definition.
DOT is good for lubricating seals, but a silicone spray or lubricant is better. Not only is silicone very slippy, but it will also help to keep seals supple. 3in1 do a good spray, or check out a plumber’s merchant for something a little thicker. I use the spray for cleaning calipers/pistons every few rides; and the thicker stuff (Hunters) for overhauls and main services.
SteveUK MTB
October 28, 2010 at 6:32 pm
la mia bici ha problemi dell supporto campio e manubrio non mi entra la catena nelle corone eil manubrio si blocca
niki3068
February 21, 2011 at 11:03 pm
il mio hovercraft è pieno delle anguille?
SteveUK MTB
February 21, 2011 at 11:15 pm