Shimano Hub Overhaul (Cup and Cone)
(click on a picture or link for a larger image to open in new window)
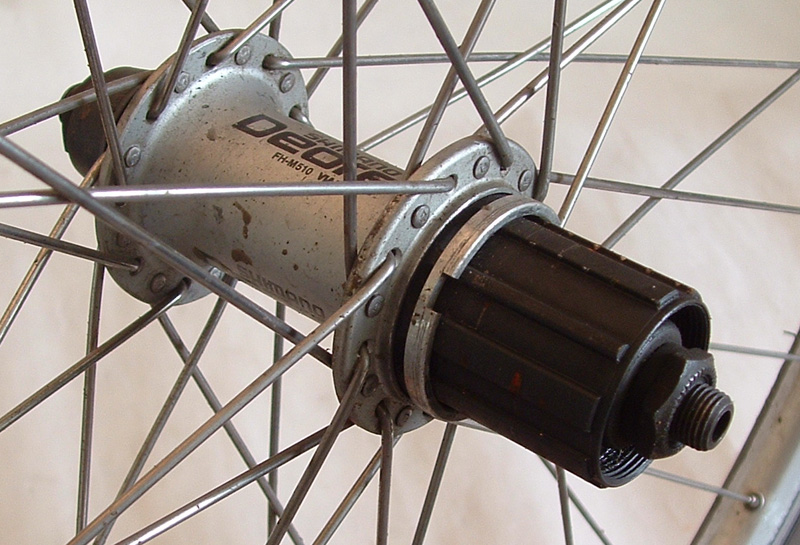
This is a guide for overhauling a rear Shimano Deore cassette hub, which uses cup and cone bearings. The cup is the bearing race which is built into the hub; the cone is the corresponding race which is threaded onto the axle. Whilst cone races can be replaced if they are worn or pitted, the cups of the hub can not. Any pitting or excessive wear to the cup races is terminal and means replacing the entire hub.
Although there are some very small variations in components (mainly seals) this guide should be relevant for hubs up to, and including, Deore XT. I have no experience of XTR hubs. The hub shown is the non-disc version, although I have no reason to believe there to be any notable difference in components in a disc hub (any information to confirm/correct this assumption would be welcomed). There are no procedures required to overhaul a front hub which aren’t covered in this guide.
I don’t re-use bearings. If you’re dismantling the hub for any reason other than general maintenance (broken axle?) and intend to re-use the bearings, keep the drive and non-drive side bearings separate as they may not wear evenly in relation to the cup/cone races. They should be cleaned with WD40/degreaser and a clean cloth, or tissue, rinsed with Isopropyl Alcohol (IsA) and then dried thoroughly. Keep an eye out for any dirt/grit or small pieces of metal as solid contaminates will lend themselves to the premature destruction of bearings and cup/cone races. Also look out for pitting on the bearing surfaces (see picture 15). Always replace bearings in sets as a new bearing will be larger than one which has been in operation and will cause uneven wear of the races.
The specialist tools required for this job are: a chain whip; a cassette removal tool; a set of cone spanners; 15mm (13mm for front) and 17mm, and, if you’re removing the freehub body, a 10mm Allen key.
It’s worth having a small plastic container handy to drop parts into, as they will all need to be degreased and rinsed.
The bearings in a Shimano rear hub are ¼” in diameter and each race contains 9 bearings. Front hub is 3/16″. Expect to pay around the £/$5 for good quality bearings, Grade 100 or better (try SJS Cycles in the UK).
Remove the wheel from the frame and remove the cassette (1) (seven speed bikes will also have an aluminium spacer (2)) and lay it down on the drive side. Using a small, flat-headed screwdriver, carefully prise the rubber seal away from the non-drive side end of the hub. The easiest way to do this is to nip the seal between thumb and forefinger to elongate it before inserting the screwdriver into the space created. I dismantle the hub assembly from the non-drive side. Picture (3) shows the cone/axle assembly. Whilst a 15mm cone spanner is required to hold the cone, I’d advise using either a ring spanner or socket wrench to hold the 17mm nut at the top of the assembly. Holding the cone in place, loosen the top nut (4).


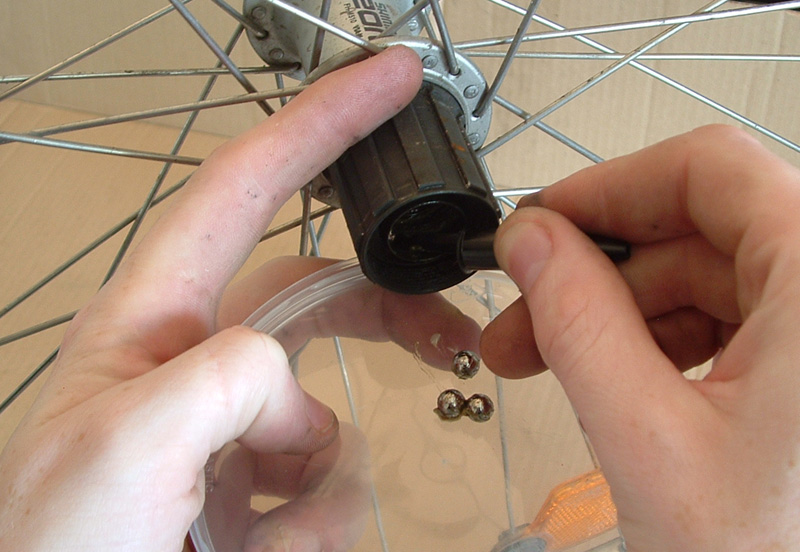
One of the reasons I take pictures of the work I do is in case I forget how things go back together! One great way to keep assemblies in the correct order (thanks to Park Tool’s excellent website for this..) is to drop a large washer onto a cable tie, push the other end into the axle and feed all the components onto the tie as they are removed (5). The cone race itself has a metal shield pressed onto it which should be left in place (6). Holding the wheel vertically, remove the axle from the drive side (with cone assembly still in place). Tilt the wheel towards you and, using something like a pen top (not metal), carefully extract the bearings onto a container (7).


Flip the wheel and do the same for the non-drive side.
Remove all of the old grease from the non-drive side cup using tissues and cotton buds.
The drive-side cone assembly comes apart in the same way as non-drive side. Disassemble and thoroughly clean (remember to rinse with IsA) and dry all components.
If you wish, the freehub body can now be removed using a 10mm Allen key (8). Note the splined boss that the freehub sits on (9) and the unusually shaped washer (10). Servicing of the freehub body is limited. Remove all the grease from the cup race using tissue and cotton buds. Do not use a degreaser as it will spread into the freehub mechanism and ‘clean’ that out also. Wipe the exterior and carefully prise the ring seal on the back of the freehub body. Using a tissue, carefully wipe the ring of bearings. I apply a very thin ring of grease around the bearings before replacing the seal, although ideally you would use a very light oil. When the seal is fully in place, wipe away all excess grease as it will only attract dust. Refitting is simply the reverse of removal, just don’t forget the odd shaped washer. Also, make sure that the freehub body is sat firmly on the splined boss and that the retaining bolt is threading smoothly into the hub. Picture (11) shows the entire drive-side assembly. Note the flattened thread of the axle. The drive-side cone can now be re-assembled (12) leaving around six threads exposed on the end of the axle. The axle from an XT hub may have about 5/6mm without thread on each; set the outside of the cone assembly 1/2 threads in after the flat section.

![]()


As I said at the beginning, corrosion, or pitting, of the cup surfaces more or less spells the end of a hub. Now that everything is spotlessly clean (at least it should be!), you can inspect the bearing races. As you can see in picture (12) a race may have a line worn into it; this is acceptable as long as the surface of the race is smooth. Closely inspect both cone races for any signs of uneven wear or pitting (you could even use a magnifying glass). Generally speaking, a cone race will wear out before a cup race, so if you catch corrosion on the cone you’re in with a good chance of being able to remedy it before it affects the cup race. A worn cone will cause uneven wear to the bearings, which will transfer that damage to the cup race. As you can see in pictures (13) and (14) the cup races on this hub are immaculate. The cup in picture (15) is clearly not. This kind of pitting will destroy bearings in a very short amount of time (and it did!) and is not repairable.


Once you’re satisfied that all is well you can fit fresh bearings. I use Pedro’s Syn Grease, and recommend it highly. It’s a good, thick grease which doesn’t break down (like white Lithium will), and works well to help seal water out of your bearings.
A grease gun or syringe is perfect for running a ring of grease around the cup race. A small amount of grease on the end of the pen top will stop them from rolling away (16). Starting on the non-drive side, carefully replace all the bearings and run another ring of grease over the top of them (17). Smooth it down with the back of the pen top. Don’t go mad with the grease; too much will create its own excess friction. Flip the wheel and follow the same procedure to install the drive-side bearings into the freehub body (18). Once you’re done, insert the axle (with drive-side cone assembly already fitted) into the freehub body, taking care not to dislodge any bearings from either side on the way through. Keeping a finger on the drive-side end of the axle, flip the wheel and refit the non-drive side cone by screwing it down the axle until it just touches the bearings (19). Refit the rest of the assembly, turning the top nut to finger tight.


All refitting adjustments from this point should be made from the non-drive side.
The idea behind cup and cone bearings is that the two races sandwich the bearings, but with the smallest amount of compression possible. Too much and the excess friction on the bearings/races will eventually cause them to disintegrate under load; not enough and the assembly will move around on itself, ultimately causing uneven wear on the bearings and races.
So, once you’ve screwed the cone down to the bearings, back it off again by 2/3 minutes (60 minutes being one full rotation) and, holding the cone with the cone spanner, tighten the top nut.
Hold the axle at each end and wiggle it, then rotate the axle. Remember that you’ve just put fresh grease in the hub, so it’s not going to be super-smooth, but the axle should spin feely (try over-tightening slightly to get a feel for this). There should be no lateral play in the axle.
Sometimes the tightening of the top nut will compress/relieve the assembly slightly, adjusting the adjustments you’ve made. If this happens, you’ll have to go back to square one and re-adjust the cone, taking into account the affects of the top nut. Loosen the nut; adjust the cone; tighten the nut; check; repeat until axle spins freely and without play…
When all feels right, the final check is done with the wheel in the frame. Refit, tighten the bolts/QR; this will compress the assembly a small amount and should be considered part of the cone adjustment procedure. Then give the wheel a gentle spin. It’s actually easier to determine how freely the bearings are rolling by the way the wheel stops. Of course, listen out for any obvious friction, but the wheel should actually be brought to a halt by the friction of the pawls in the freehub. Hold the wheel at top and bottom and check for play in the axle. With experience, any adjustments at this point can be done with the wheel in the frame, but it is much easier at first to remove the wheel.
This guide and the photographs contain within it are my property and as such are covered by copyright. Please feel free to provide links to this guide, but do not copy or reproduce any part of it without my permission.

Hi,
I have a question for you. I have XT XC M775 wheelset and they are not spinning as freely as my old wheels. These are brand new and not been used yet but compared to my old Mavic 317 rims with DT swiss hubs the XT’s do not spin as freely sitting on the frame with no brake pads in. Can you suggest a reason
Matthew Bassngthwaighte
September 17, 2008 at 5:12 am
It’s not unusual to find a little more resistance in a new hub, but if you think that it’s excessive you should let somebody else take a look. My guess – which is all I can do – is that everything will loosen up after a few miles of use. Another consideration is that the 775s are slightly different to typical cup and cone in that the bearings are mounted in cages (here are links to Shimano PDFs for front and rear). This could increase resistance on the stand, but will not be perceptible when you’re riding. I can really only guess as to whether or not you even have a problem, so I’d suggest letting somebody with a little more experience than yourself get their hands on your wheels. Good dirt…
SteveUK MTB
September 18, 2008 at 10:52 am
Hi,
I have a Shimano FH-M475 rear hub that I have stripped down for maintenance. Unfortunately i have discovered pitting on the non drive side bearing cup however, the cup looks as if it has been pressed in at manufacture and is not actually part of the hub.
Is it possible to replace this cup?
Thanks
paul
October 11, 2008 at 10:25 pm
As I explain in the guide, pitting of the cups is the beginning of the end for the hub as they can not be replaced. It will be possible to continue to ride it, but you’ll not get much life out of a set of bearings. Time for a new hub, unfortunately…
SteveUK MTB
October 13, 2008 at 10:32 am
I also have an FH-M475 rear disc hub. I fear that my free hub is failing. I have read that the original Y-3SL 98030 free wheel body is no longer available. Will the Y-3A3 98020 work as a direct replacement, as I have read?
Thanks.
Jeff
November 4, 2008 at 3:36 am
With regards to the ability to interchange components, I really wouldn’t like to say. It seem strange for Shimano to stop producing for spare parts a component that they still supply with a complete item – many new bikes come with the M475 fitted. It is, of course, possible that they’ve changed the design and this the new part number, so my recommendation would be contact Shimano (in your country) directly and ask them for clarification.
It would be very helpful if you’d post back here with your findings as the M475 is possibly the most common hub on shop-bought MTBs.
SteveUK MTB
November 4, 2008 at 11:21 am
I am posting back with some more info I found on the FH-M475 hub regarding my question in the previous posting. The Shimamo spec. sheet shows that the complete freewheel body is interchangeable with the freewheel body in the FH-M525. Although, it specifies it as a ‘B’ grade compatability which is described as, “Parts are useable, but differ in materials, appearance, finish, size, etc.” Thanks for your input – great overhaul instructions!
Jeff
November 5, 2008 at 2:45 pm
Thanks for that, Jeff.
SteveUK MTB
November 11, 2008 at 7:23 pm
This article has helped me understand my bike so much more. I seriously appreciate you taking the time to explain everything so simply, and the pictures really do make a world of difference. Thank you.
Anthony
December 26, 2008 at 9:50 am
Thank you very much, Anthony, and long may you wrench your own bike…
SteveUK MTB
December 26, 2008 at 5:38 pm
in africa we have learnt to do most things our selves , i was having problems purting my hub back to gether but have seen where i might have gone wrong , so will put the parts back in acording to your pictures ,
do you have diagrams of the componets like in a car machanics manual , i tried looking up on the shimano sweb site but they keep it a secret me thinks .
Thanks Warwick south africa
warwick
January 30, 2009 at 3:37 pm
You can download technical documents for Shimano hubs from the Help desk (link) on the Shimano site.
SteveUK MTB
January 30, 2009 at 6:20 pm
versy usefull. Keep the good work comming ! 🙂
Biek
April 2, 2009 at 5:51 pm
good clear guide. thanks.
dave
May 18, 2009 at 7:21 pm
Thank you, this is beautifully explained and illustrated.
Doug
July 7, 2009 at 4:07 am
Awesomeness! Thanks for the great how-to.
Sean
July 30, 2009 at 5:33 pm
Hello Writer, I am not sure why you have neglected to mention the very tool that will cleanly lubricate the 48 internal bearing inside the Freehhub mechanism. The tool is called the Freehub BUDDY. It has been around for 20 years lubricating tens of thousands of FH around the globe for faster shifting and FH longevity.
Lennard Zinn has a 5 minute video on the subject. Any questions concerning the tool and or the lubricant or reusable replacement dustshields can be forwarded to sales@morningstartools.com – I’d be happy to answer any questions.
til then HAppier trails, Paul morningstar
can send pics of the internals and/or a mile’s worth of testamonials from happy customers.
Paul Morningstar
September 5, 2009 at 10:25 pm
These manuals are close to perfection. Great job.
To the point explications, clear layout, helpfull links to the clear pictures. Fantastic job! Thanks you so much.
Manouche
November 23, 2009 at 2:59 pm
Thank you very much for your comments.
SteveUK MTB
November 23, 2009 at 9:34 pm
Hi,
Massive thanks to Steve and the rest of you guys…tackled my rear hub for the first time ever today and after a little web-searching found this page…SUPERB & CLEAR guide for all a budding bike mechanic needs to know about Shimano hub repair…couldn’t have made it better!
Off to check the results of my labour now…fingers crossed!!!
Thanks again.
Davo
December 1, 2009 at 3:21 pm
thanks for that. Unfortunately all my ball bearings fell down on the floor during the operation on my rear hub. I bought some new ones but I can’t work out how many are needed in each cup. It’s not 9, 12 could be fit in, but a small gap is left and I got a dreadful noise when riding. I tried 13 but it’s too tight and this number does not seem right. Any idea? cup completely wear out?
NoGoodAtDIY
December 15, 2009 at 10:25 pm
There should be nine bearings in each side of the rear hub. If you can fit twelve in, then you have the wrong size bearings.
SteveUK MTB
December 15, 2009 at 10:50 pm
Just followed these instructions, only part I missed was that on the drive side you need to preload the tension on the cone with the adjusting nut (takes 15mm cone) on the axle before inserting axle through the hub. In my case about 5 to 6 threads were left on the outside of the adjusting nut.
thanks Steve UK MTB.
david
February 18, 2010 at 12:46 am
I’m not understanding your comment, David. Preload is only done from one side. The drive-side cone/lock-nut assembly is fitted first and tightened right up; the axle is then fed into the drive-side so that theadjustments for preloading of the bearings can be done from the (easier) non-drive-side.
SteveUK MTB
February 19, 2010 at 3:15 pm
Just wanted to say thanks for the guide above – its by far the most helpful step by step I’ve found on the issue and its made my life a lot easier this evening stripping and cleaning my rear hub.
Jonathan
March 11, 2010 at 8:56 pm
Hi I have a SG-3C41 Inter 3 hub w coaster brake shimano made for tricycles My question is it
possible to replace the axle with a longer 1
i need longer axle to fit frame im working with
I have no experience taking apart hubs would
removing just the axle be possible without
taking apart the complete hub i thought of a
coupling to make it fit wide frame but i cant
seem to find 1 that is more than 24 tpi any
help appreciated
James
April 1, 2010 at 5:50 am
Hello James,
I’m not familiar with the Nexus hub, but I’m confident that the axle will not be replaceable without dismantling the hub. I presume that you have the 168mm axle at present and wish to switch to the 175mm? I’m fairly sure that a standard axle would not work and that you’ll need to buy the longer Nexus axle from a Shimano dealer. I think that it’s also not just a matter of changing the axle, as it would appear that there are other axle assembly components which differ between the 168mm and the 175mm versions. Have you viewed this (link) exploded diagram from Shimano?
This would be fun and interesting to work through, but you’ll be much better served by somebody with technical experience of the Nexus hub. If you don’t have a shop with knowledgeable techs, you could try posting your question on MTBR’s Internal Gear Hubs forum (link). You may also find this website (link) to be of help.
Hope you get something sorted…
SteveUK MTB
April 1, 2010 at 7:19 pm
Hi Steve Thanks for the reply and links
the 175mm would not be long enough so im
trying to find coupling of some kind
thinking an axle peg if i can find 1 with
threads deep enough
James
April 1, 2010 at 9:02 pm
Hi,
This is an excellent guide and one that I wish I had read before servicing my rear hub. Unfortunately I didn’t take pictures of how it came apart, do you have a photo of how it all goes back together and in what order?? (I seem to have several washer left over!!!)
Cheers
Michael
April 5, 2010 at 8:29 pm
There’s one included in the guide.
SteveUK MTB
April 14, 2010 at 9:18 am
Hey,
Great article and photos…your clarity shines through like no other! Thank you
padre
padre
April 19, 2010 at 1:42 am
To be clear Pedros Syn Grease is this?
http://www.pedros.com/synlube.htm
William
May 3, 2010 at 12:59 am
No, not at all. That’s a chain lube and completely unsuitable (too thin) for lubricating bearings. It appears that Pedros don’t do the Syn Grease any more; the Bio Grease (link) seems to be the replacement.
SteveUK MTB
May 3, 2010 at 8:41 am
Was looking for advice, rebuilt an M525 rear hub, typical Shimano failure due to broken pawls, ordered and installed new freehub. Twice now after re-assembling and pre-loading bearings everything seemed fine, no play in hub, mounted back on bike left it overnight, next morning there’s play in the rear hub. If I preload any tighter I can feel bearings move against the races.
Any suggestions?
Steve
May 12, 2010 at 5:01 pm
So what adjustment do you make after you find it to have developed play? Where is the play? In the bearings? Did you remember to refit the funky washer that sits between the freehub body and the hub?
SteveUK MTB
May 12, 2010 at 10:18 pm
That funky washer is in place, the freehub is snug with no play against the hub but moves freely. The first time I went back thru and totally disassembled, thinking maybe the cone on the freehub side was not tight or had loosened up against the freehub dust cap. Didn;t appear so, but that sidn’t make a difference after reassembly. Both sides of the axle are symmetric within the dropouts.
When I initially reassemble everything and QR into the bike it feels proper, but next day you can move the wheel and feel slop almost like the cones are not in far enough.
Next step is to disassemble the freehub, I’m starting to think that the internal assembly is not completely tightened in. Possibly why these hubs have so many reported problems eating pawls as outwardly everything would appear OK, but there would be too much slop internal to the freehub body.
Steve
May 12, 2010 at 10:43 pm
You didn’t answer where the play is. If you remove the wheel from the frame, is it possible to determine whether or not the play comes from insufficient bearing preload? You need to identify why it starts off tight then works loose over time. What kind of grease are you using? How much of it?
There shouldn’t be any laterall movement of the wheel. On cheaper hubs it’s usually possible to rock the cassette to and fro a little; but this is freehub movement, not the wheel on the axle. The only way that a wheel will move laterally is if there is a gap between the bearings and the races (cups and cones).
SteveUK MTB
May 12, 2010 at 11:23 pm
Like I said it feels like the cones aren’t adjusted correctly after about 8 hours of just sitting there. If I preload anymore than I already am, the bearing/cone drag is too much and I don’t want to damage the races.
Steve
May 13, 2010 at 12:00 am
I know you said that it feels as though the cones aren’t correctly adjusted; but my question is: where is the play coming from?. You’re asking for my advice but don’t answer any of the questions I need answered to help me, and you, understand precisely what’s causing the problem.
SteveUK MTB
May 13, 2010 at 11:31 am
I needed to pin down the source of problems better myself at this end by tearing it down again.
It feels like the play is on the freehub side, I can move the axle slightly up and down by hand, but the freehub body itself is solid, with solid lockup to the hub.
Nothing feels loose internal to the freehub with a finger although it’s not easy to manipulate internally without complete disassembly which Shimano doesn’t recommend, Got a small screwdrive on the freehub bearing race spanner detent and it didn’t move so it’s at least not terribly loose but it’s still a possibility.
Cassette was rock solid. All nuts & cones were still tight side-to-side , no play laterally so the cone adjust doesn’t seem to be the issue. It has to be play in the freehub body itself. I’ve seen reports of guys blowing out the replacement freehub bodies after only a few days.
On a side note, once you take these freehub bodies apart you can see why there’s so much trouble. A completely unbalanced pawl arrangement. The 2 pawls are 120 degrees apart and a third pocket where you could put one 120 degrees in either direction from teh other 2 (although not shaped the same) is empty.
Steve
May 13, 2010 at 3:05 pm
Unless you’ve overlooked something blindingly obvious, like the wrong sized bearings, then all that comes to my mind is a faulty freehub. You can eliminate the possibility of play in the bearings simply by overloading them. You don’t need to worry too much about damage as long as you don’t try spinning the wheel. Just tighten the adjustment cone a 1/4 or 1/2 turn further than you would to preload them properly, then check again for play.
If you’re confident that everything else is as it should be, you might just want to try returning the freehub body for a replacement.
SteveUK MTB
May 13, 2010 at 3:56 pm
What a well written and illustrated primer. Thank you very much! Makes a big difference seeing step-by-step photos rather than just the exploded parts diagram.
Bill
May 27, 2010 at 6:36 am
Brilliant guide. First time stripping a hub and replacing with new bearings and it went beautifully.
Concise, clear, detailed and purely relevant to the task.
Thanks
jasondo23
July 26, 2010 at 7:21 am
I’ve just, for the 1st time stripped and rebuilt my rear hub (a Shimano XT 750). I used the excellent step by step instructions above.
All I can say is a big ‘Thank You’ for this.
Thanks again,
Rob :o)
Rob
July 31, 2010 at 4:30 pm
Thank you. This is just what I needed to help explain how to tighten my wheel
Steve Coverdale
August 1, 2010 at 10:35 pm
On the drive side of a shimano hub (8 speed), can the cone, spacers, nut be unscrewed from the axel? I am having a tough time getting those components out. Thanks.
mike h
September 15, 2010 at 3:15 pm
What is the model number of the hub?
SteveUK MTB
September 16, 2010 at 11:47 am
Thanks for the clear instructions and pics. I used this along with the Shimano exploded diagram to service an XT M765 disc rear and everything in that hub seemed to correspond to your guide. We are bike riders and we should be the masters of our own stuff. I almost feel like I know what I’m doing 🙂
konafan
October 3, 2010 at 8:46 pm
Hi, i would like to ask if it is possible to overhaul the Complete Freewheel Body (#18 Y-3A3 98020) of a Deore FH-M525? I feel a little roughness when i spin the wheel http://techdocs.shimano.com/media/techdocs/content/cycle/EV/bikecomponents/FH/EV-FH-M525-2067B_v1_m56577569830728349.pdf
Thanks in advance for any suggestions.
LYNX
October 11, 2010 at 11:57 am
You can take the freehub body apart, Shimano does not recommend it. Likely you will find a problem with one set of pawls sheared or damaged which appears to be very common on these freehubs. Took mine apart to find out what was really going on, pic below as you can imagine the engagement teeth were thrashed. Shimano only sells the freehub body itself as a replacement, so unless you had a donor a rebuild isn’t really likely.
[IMG]http://i823.photobucket.com/albums/zz151/sa_jackson_video/IMG_1425.jpg[/IMG]
Steve
October 12, 2010 at 8:46 pm
I have a Shimano FH-M475 rear disc hub. It may be difficult to describe my issue but has anyone ever heard of a problem with the free-hub where it will spin forward without turning the wheel? The issue may be my rear cassette and chain (i.e. skipping on worn cassette and old chain) but sometimes it just seems like it spins foward without turning the wheel but there is no noise of a chain skipping.
John
October 20, 2010 at 3:35 pm
It sounds as though the pawls are failing/have failed. Skipping off gears is, as you say, something where one would expect to hear a noise. As you describe it, the problem would appear to be with the freehub. I’d suggest taking it to a shop and letting somebody take a look.
SteveUK MTB
October 20, 2010 at 11:05 pm
How do I find a compatible freewheel body (part number is Y-3SL98030). I read above that it is no longer available. I don’t get what the headings C, QBP#, and S mean in this interchangeability chart:
Click to access 06)%20Freehub%20Interchangeability.pdf
john
October 21, 2010 at 4:26 am
As I understand it, you can replace the freehub with any compatible (A, B or C) freehub. QBP# is the stock code for QBP, the wholesalers for pretty much all bike parts in the USA. The code is on the Shimano chart to assist dealers – I don’t believe that consumers can shop direct. The ‘Y’ and ‘N’ would appear to stand for ‘yes’ and ‘no’; but I’ll confess to my ignorance of what they confirm.
SteveUK MTB
October 21, 2010 at 11:16 am
Follow-up – I replaced the freehub yesterday and it feels like a totally different bike now. Really incredible difference. I think I let it go so far that there were all sorts of tics and so on but I think most were the freehub. I will have to ride some more to see if there is any chain skipping.
john
November 15, 2010 at 12:46 am
Thanks for the responses. I’ll take a print out of that chart to a bike shop – maybe they can verify it but it would seem that Shimano freehubs are for the most part interchangeable (most are listed as A) but I still don’t know what the S heading means.
john
October 21, 2010 at 12:47 pm
Very useful information steve, thanks a lot
Chen
November 11, 2010 at 12:52 pm
Hi Steve,
Thanks for such an insightful and clearly constructed guide. I now have a greater understanding of hubs and can share this with my biker friends.
Cheers
Jonathan
jonathan fry
December 18, 2010 at 1:44 am
You say that the freehub body is not really serviceable. In the desert here, the ultra fine sand gets into everything and must be cleaned out regularly or it will trash the component. With the freehub, I remove the bearings then soak it in solvent overnight. I then alternate flushing with clean solvent and blowing with compressed air intil the solvent coming out of the freehub is absolutely clean. You wouldn’t believe how much crud comes out after only 2 or 3 months use. I was stripping out freehubs about every 1000 miles (two to three per yesr) before figuring this out. I now get a couple years before I replace the freehub and it works and sounds better besides. I drip several drops of 20-50 synthetic oil into the gap behind the bearings to relube the pawl/ratchet mechanism, then reinstall everything just as you advise in your excellent description above. The whole process only takes about 15 minutes longer than just ignoring the freehub, but sure saves a lot of expence in replacing XT freehubs.
DezRat
December 22, 2010 at 6:43 pm
hi steve. ive got a problem with my xt rear hub. the drive side lock nut has come loose, however the action of tightening from the drive side just tightens up the bearings, and because you cant hold the bearing race with a cone spanner (hidden by the freehub) its impossible to get the bearings to the right tightness, if i tighten it to be smooth, the minute i put it in the bike, the lock nut tightens and crushes the bearings. so i thought i will try taking the whole hub apart, this would allow me to get the drive side tight on the bare axle (like picture 12), and then i would do as you explained and re assemble from the non drive side. but when i came to undo the non drive lock nut, it is too tight to undo even with wd40 etc, (i was doing it anticlockwise, which is the correct way i believe). this inturn led me to rounding off the corner of the locknut, so now i cant see how i can get the damn thing off! so without the aid of adjusting the preload form the non drive side, how do i get the locknut tight on the drive side without crushing the bearings?
oli
January 7, 2011 at 5:49 pm
Hi Steve,
first off let me say how awesome these step-by-step instructions are with great (helpful) photos. It inspired me as a first timer (hub service) to give it a go. Which to me all adds up to great guide and by far the best I’ve found on the web!!
Unfortunately I have run into a bit of a problem. I seem to have completed all the steps and have the wheel running (what feels to me) nice and smooth. Then I put it back in the frame and tighten up the quick release and now the disc rotor is rubbing against the calliper mount and the wheel cant turn. Its almost like it’s too far over to the non drive side now. If I have it any looser (so the rotor doesn’t rub) then there is side to side movement of the wheel because the cones aren’t tight enough. The bearings are new and the hub itself aint that old (so no real wear) and was working well before I got to grips with it. I have about 6 threads sticking out on the drive side axle. And I have installed everything back on that came off :o)
Any idea what I might be doing wrong?
Jon
February 8, 2011 at 9:19 pm
Hi Jon,
Any reason why you can’t just realign the brake caliper?
SteveUK MTB
February 8, 2011 at 10:36 pm
I’d be happy to do that if it was just rubbing in the caliper. However it’s that far over now that it’s tight against the caliper mount and wont even spin round. What I cant understand is how it’s now so far over that way!? Everything that came off the hub went back on it.
With a mates wheel (with a working hub) mounted and spinning correctly in my frame it looks to be about 4mm that my hub is over too far.
Jon
February 9, 2011 at 5:45 pm
I see. Well, if it was OK before you removed the cones from the axle, then it would seem logical to just refit the non-drive side cone assembly so that it’s further inboard on the axle. Assuming that everything is fitted in the correct order, this is really the only way that the hub (and disc mount) can be moved to enable the rotor to clear the mount.
SteveUK MTB
February 9, 2011 at 6:01 pm
Not too sure that I understand what you mean.
This whole thing has me totally confused to be honest.
It seems the position the non drive side cones have to be in to stop it going over too far is too loose and I get side to side movement in the wheel. If I get the correct amount of tightening to the cones then when it goes in the frame it’s tight up on the mount :o(
Jon
February 9, 2011 at 6:16 pm
It’s not about the load on the bearings/cones, so get that out of your thinking for now. As I’m understanding it, you’ve refitted the non-drive side cone assembly (cone/spacers/locknut) too close to the end of the axle, which has the effect of positioning the entire hub closer to the end of the axle, and, in turn, has pushed the brake disc (which is bolted to the hub) so far out that it catches on the brake mount.
Your fix, if I’ve read this properly, is to dismantle the whole hub (sorry!) and refit the non-drive side cone assembly a thread or two further in on the axle. When you rebuild, the hub (and brake disc) will then be positioned a thread or two closer to the other end of the axle and will mean that the brake disc clears the brake mount. See?
SteveUK MTB
February 9, 2011 at 9:33 pm
Thanks for the reply Steve.
I know it must be quite frustrating dealing with someone quite so mechanically inept!!
I’m in work right now so I cant give your latest bit of advice a go until tonight.
From memory however I think whats happening might be the opposite to what your thinking I mean (I think??).
I’ll try and explain although as you have already noticed I cant seem to quite explain whats happening very well :o)
First having cleaned greased and reinstalled the 9 bearings to both sides of the hub……
(1) I reinstalled the axle through the hub. It had the drive side cone (plus all spacers and locknut) in place with 5 threads sticking out the drive side side.
(2) Then I thread the non drive side cone until finger tight, the wheel spins freely.
(3) Then I thread on the spacer, thin washer and locknut and tighten cone and locknut together.
At that point the wheel spins and theres no up down movement in the Axle, it seems to be refitted correctly.
However when I fit it into the frame and tighten the quick realise the disk is tight up against the calliper mount and the wheel will not even turn round.
So it would seem to me that the non drive side cone and spacer, washer and locknut have been thread too far towards the centre of the hub. Would this even be possible?
The only thing that could possibly move is the dust cover thats around the cone (non drive side) has slid along the cone thereby allowing the hub to move the 4mm ish along the axle towards the disk mount?
To illustrate what I mean , as it stands now if I had another spacer of about 5mm and put it on the axle between the non drive side locknut and the dropout/quick release I would imagine it would all run correctly.
I’ve probably just confused the issue even further but I do appreciate your continued help!!
Jon
February 10, 2011 at 9:11 am
Hi All,
I am trying to re-build an older Trek( circa ’80’s I think), and have taken the axles completely apart, noticed the dust cap/washers seem to be somewhat worn or degraded, gaps and would like to replace them. Any idea where I might find replacements.
Chet
Chet
July 27, 2011 at 5:59 pm
Shimano parts will come as part of a complete axle (pricey). You could buy an old hub off eBay and scavenge the parts, or try your local bike shop and see if they have any lying around.
SteveUK MTB
July 27, 2011 at 6:14 pm
Super clear photos and text – many thanks.
Gordon
August 7, 2011 at 10:21 pm
Hi, thanks for the guide – very clear instructions.
I’ve found that both of the lock nuts (drive and non-drive side) had come loose on my hub (after about 8 months of riding). I followed this guide and cleaned everything down, inspected for wear (everything seemed fine) re-greased and re-assembled, as per above. I slightly overtightened the assembly and noticed that my wheel wasn’t spinning as freely as a friend’s, who has the same hub and the same problem of the lock nuts coming loose every once in a while. I decided to loosen up the assembly to get the axle turning a bit more freely and noticed that both the lock nuts had come loose again, after just one short ride! I could undo both lock nuts with my fingers.
Have I done something wrong in the re-assembly? I can’t see how the drive side lock nut stays in position. Everything seems to hinge on having the drive side nut in a certain place and then tightening everything else up to it, but if the drive side nut is coming loose after a ride, what’s the solution?
Any help greatly appreciated.
Alex
September 5, 2011 at 3:02 pm
Hello Alex, pardon me for taking so long to reply. Even if the cones are too far apart and there is play around the bearings, tightened lock nuts should not be any more likely to work loose. The design is tried and tested over decades, so the balance of probability would suggest user error – you just need to get that lock nut on super-tight. There are a couple of things that could help, though. Apply a little grease to the axle threads and to the mating faces of the lock nut and cone/washer. This will allow you to get maximum torque into the lock nut.
The drive-side assembly can be tightened before the axle is fitted to the hub, so get your hand into it with a good wrench and make sure it’s as tight as you can manage. You’re highly unlikely to strip the threads. The non-drive-side assembly is obviously a little trickier as you’re trying to maintain bearing pre-load pressure; but it’s really nothing more than trial and error until you get it right. Try to focus on keeping the cone spanner still while tightening the lock nut – this is the skilled part. As with the other, you’re unlikely to strip the threads, so don’t be too cautious…
SteveUK MTB
September 10, 2011 at 12:42 pm
Thanks very much for the reply. I did give it a good bit of welly before reading this, but it’s good to know that that’s what you reccommend! Yet to test it out but if it loosens again I’ll try greasing the axle thread and mating faces. Word of warning to anyone using cheap cone spanners – don’t bother if you’re trying to get the lock nuts on tight! Mashed one pretty badly on this job but think it slipped onto a washer. No damage to the cone/axle/nut so think I’m OK, as just changed the washer out but as you mention above, focussing on keeping the cone spanner steady is the key.
Alex Jackson
September 12, 2011 at 8:50 am
[…] it is indeed a freehub, all it takes is a 10mm allen key once the axle has been removed. I recently swapped out a UG freehub body for a HG one off a cheap new hub on eBay. I'm not sure […]
Shimano 600, 6 speed issue. - London Fixed-gear and Single-speed
September 29, 2011 at 6:41 pm
[…] grösste Challenge waren die Naben der beiden Laufräder. Im Internet habe ich gelesen, dass man die Kugellager ersetzen kann. Das Ausbauen und putzen der Naben war noch relativ einfach. […]
Scott Genius MC 40 Upgrade Teil 1 ! | Spoony's Bike Blog
February 26, 2012 at 10:17 am
[…] Well, they use what they call a labyrinth seal but it's not like a sealed cartridge bearing. You can disassemble the cups and service the bearings easily enough. […]
Road Wheel Recommendations? - Page 20 - London Fixed-gear and Single-speed
February 1, 2013 at 1:21 pm